Register a stake pool
WARNING: This tutorial is simplified and deliberately excludes secure key handling which is essential for other testnets and mainnet. For a comprehensive tutorial, see the Cardano course where you can access video lessons and a more detailed instruction handbook.
Prerequisites
Before you start, ensure that you have:
- A running node: see the tutorial
- Created keys and addresses: see the tutorial
- Requested funds from the faucet
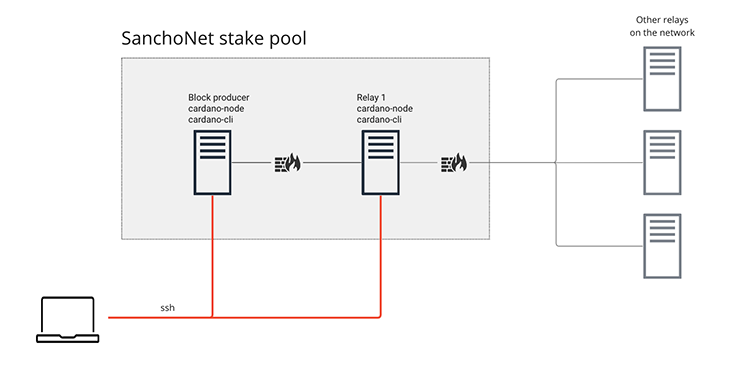
Set up a relay node
Setting up a stake pool on SanchoNet involves configuring a block producer node and at least one relay node. The relay node plays a crucial role in propagating the blocks forged by your block-producing node, as well as fetching blocks from other stake pools and serving them to your block producer. In this structure, the block producer communicates solely with your relay node, which in turn interfaces with the rest of the network. This ensures a streamlined communication process and helps to secure your block producer.
The typical configuration of the stake pool should resemble the following:
To set up your relay node, carry out the following steps:
Install the Cardano node and the Cardano CLI on your relay node.
Configure the firewall for incoming connections: set up the firewall to accept incoming connections on the specific port that you'll be using for the Cardano node. This allows other nodes, including your block producer, to communicate with your relay.
Configure the firewall for outgoing connections: enable the firewall to allow outgoing connections. This configuration ensures that your relay node can contact other relay nodes in the network as well as your block producer node.
Run the node with P2P topology: start your node using the P2P topology setting.
{
   "localRoots":[
      {
         "accessPoints":[],
         "advertise":false,
         "valency":2
      }
   ],
   "publicRoots":[
      {
         "accessPoints":[
            {
               "address":"sanchonet-node.world.dev.cardano.org",
               "port":30004
            }
         ],
         "advertise":false
      }
   ],
   "useLedgerAfterSlot":1000000
}
Set up a block producer
Setting up your block producer involves similar steps, but there are a few differences in the configuration:
Install the Cardano node and the Cardano CLI on your block producer node.
Configure the firewall for incoming connections: set up the firewall to accept incoming connections only from your relay node on the specific port that you'll be using for the Cardano node. This ensures that only your relay node can communicate with your block producer.
Configure the firewall for outgoing connections: enable the firewall to allow outgoing connections, preferably, only to your own relay's IP and port.
Run the node with P2P topology: start your node using the P2P topology configuration. This time, replace "address":"x.x.x.x" and "port":3000 with the actual IP address and the port of your own relay node. Note that the block producer does not connect to
sanchonet-node.world.dev.cardano.organd we avoid using ledger peers by setting"useLedgerAfterSlot¨to-1
{
   "localRoots":[
      {
         "accessPoints":[
            {
               "address":"x.x.x.x",
               "port":3000
            }
         ],
         "advertise":false,
         "valency":2
      }
   ],
   "publicRoots":[
      {
         "accessPoints":[
         ],
         "advertise":false
      }
   ],
   "useLedgerAfterSlot":-1
}
Install jq and set the node socket path
- Install jq, a tool that will assist in parsing the UTXOs for transactions:
sudo apt-get install jq -y
- Set the
CARDANO_NODE_SOCKET_PATHvariable to the path ofnode.socketthat you identified when starting the node:
export CARDANO_NODE_SOCKET_PATH=~/node.socket
Register the stake address
- Register the stake address you previously created by generating a registration certificate:
cardano-cli conway stake-address registration-certificate \
--stake-verification-key-file stake.vkey \
--key-reg-deposit-amt $(cardano-cli conway query gov-state --testnet-magic 4 | jq .currentPParams.stakeAddressDeposit) \
--out-file registration.cert
- Create a transaction to submit the stake key registration certificate to the chain. Creating a transaction using the CLI always involves a three-step process: BUILDING, SIGNING, AND SUBMITTING the transaction.
- Build the transaction:
cardano-cli conway transaction build \
--testnet-magic 4 \
--witness-override 2 \
--tx-in $(cardano-cli query utxo --address $(cat payment.addr) --testnet-magic 4 --out-file  /dev/stdout | jq -r 'keys[0]') \
--change-address $(cat payment.addr) \
--certificate-file registration.cert \
--out-file tx.raw
- Sign the transaction:
cardano-cli conway transaction sign \
--tx-body-file tx.raw \
--signing-key-file payment.skey \
--signing-key-file stake.skey \
--testnet-magic 4 \
--out-file tx.signed
- Submit the transaction:
cardano-cli conway transaction submit \
--testnet-magic 4 \
--tx-file tx.signed
Generate keys for the stake pool
- Generate cold keys and the operational certificate for your pool:
cardano-cli conway node key-gen \
--cold-verification-key-file cold.vkey \
--cold-signing-key-file cold.skey \
--operational-certificate-issue-counter-file opcert.counter
- Generate the key-evolving-signature (KES) keys:
cardano-cli conway node key-gen-KES \
--verification-key-file kes.vkey \
--signing-key-file kes.skey
- Generate VRF keys:
cardano-cli conway node key-gen-VRF \
--verification-key-file vrf.vkey \
--signing-key-file vrf.skey
Generate the registration and delegation certificates for the pool
- Create your stake pool registration certificate:
cardano-cli conway stake-pool registration-certificate \
--cold-verification-key-file cold.vkey \
--vrf-verification-key-file vrf.vkey \
--pool-pledge 9000000000 \
--pool-cost 340000000 \
--pool-margin 0.05 \
--pool-reward-account-verification-key-file stake.vkey \
--pool-owner-stake-verification-key-file stake.vkey \
--testnet-magic 4 \
--pool-relay-ipv4 <RELAY NODE PUBLIC IP> \
--pool-relay-port <RELAY NODE PORT> \
--out-file pool-registration.cert
- Create a stake delegation certificate:
cardano-cli conway stake-address stake-delegation-certificate \
--stake-verification-key-file stake.vkey \
--cold-verification-key-file cold.vkey \
--out-file delegation.cert
Submit the certificates in a transaction
- Build, sign and submit the transaction
- Build:
cardano-cli conway transaction build \
--testnet-magic 4 \
--witness-override 3 \
--tx-in $(cardano-cli query utxo --address $(cat payment.addr) --testnet-magic 4 --out-file  /dev/stdout | jq -r 'keys[0]') \
--change-address $(cat payment.addr) \
--certificate-file pool-registration.cert \
--certificate-file delegation.cert \
--out-file tx.raw
- Sign:
cardano-cli conway transaction sign \
--tx-body-file tx.raw \
--signing-key-file payment.skey \
--signing-key-file cold.skey \
--signing-key-file stake.skey \
--testnet-magic 4 \
--out-file tx.signed
- Submit:
cardano-cli conway transaction submit \
--testnet-magic 4 \
--tx-file tx.signed
- Get your pool ID, you will need to get a delegation from the faucet:
cardano-cli conway stake-pool id \
--cold-verification-key-file cold.vkey \
--output-format bech32 \
--out-file pool.id
Starting the node as a block-producer
- Generate your operational certificate:
slotsPerKESPeriod=$(cat shelley-genesis.json | jq -r '.slotsPerKESPeriod')
slotNo=$(cardano-cli query tip --testnet-magic 4 | jq -r '.slot')
kesPeriod=$((${slotNo} / ${slotsPerKESPeriod}))
cardano-cli conway node issue-op-cert --kes-verification-key-file kes.vkey --cold-signing-key-file cold.skey --operational-certificate-issue-counter-file opcert.counter --kes-period ${kesPeriod} --out-file opcert.cert
Request a stake delegation from the faucet. Note that although the delegation will ocurr immediately, you will need two more epochs for your Block producer to start creating blocks. This due to the stake snashopt mechanism.
Restart your node using your pool credentials:
cardano-node run --topology topology.json \
--database-path db \
--socket-path node.socket \
--shelley-kes-key kes.skey \
--shelley-vrf-key vrf.skey \
--shelley-operational-certificate opcert.cert \
--port 3001 \
--config config.json
- Your stake pool will take part of the stake snapshot on the next epoch boundary. After that, you will be able to query the stake delegated to your pool:
cardano-cli conway query stake-snapshot \
--testnet-magic 4 \
--stake-pool-id <pool_id>
- After two epochs (2 days in SanchoNet) your stake pool should start producing blocks, the easiest way to verify it is to
grepyour node logs
grep -e TraceForgedBlock